
Z-5 Support
At first glance, the Z-5 may seem to be a complex maze of knobs, switches and sliders. It takes a significant amount of time to understand all of the features and functions and to learn how beatiful abstracts can be created. The best way to learn how to use this console is to just sit down and flip switches and turn knobs! Doing so may lead you down a road from which you're unable to return, which is why finding the consoles 'Home' position is very important. On this page I will lay out the steps to return the Z-5 to its home position and go over several functions of the console.
Z-5 Home Position
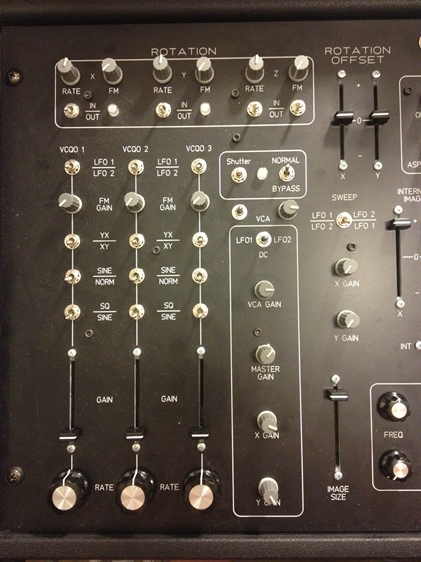
This image represents the left half of the Z-5 panel. Starting at the top, Rotation, each Rate potentiometer should be around to 12 to 1 o'clock position, each FM potentiometer should be in the full counter-clockwise position and each switch should be in the down position. The Rotation Offset sliders should be in the centered postion.
VCQO 1, 2 and 3, all switches should be in the down position, all sliders in the down position and FM Gain potentiometer should be full counter-clockwise. The Rate potentiometer can be in any position.
Just to the right of the VCQO's is the VCA. X and Y Gain should be full clockwise, Master Gain should be around 2 o'clock, VCA Gain should be full clockwise and the left-right toggle switch should be centered.
Just above the VCA is the shutter control and Normal/Bypass switch. The shutter switch is a 3 position switch, up = shutter manually opened, center = shutter closed and down = shutter controlled by external DAC. Normal/Bypass switch, when set to Normal a signal from an externally connected DAC will flow thru the Z-5 console. When set to Bypass, the signal from the external DAC will not flow thru the console, instead it will buffer the signal and send it to the projector. In Bypass, no knobs or switches will have any affect on the DAC signal.
To the right of the VCA is the Image Size slider, this should be in the full up position.
Above the Image Size slider is the sweep function, the toggle switch should be in the down position, X and Y Gain potentiometers should be fully counter-clockwise.
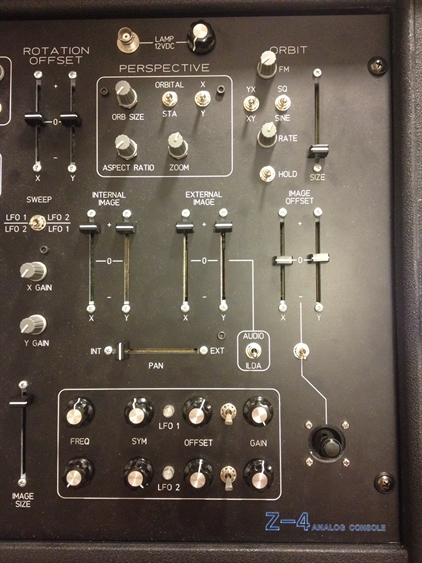
This image represents the right half of the Z-5 panel. Starting with the LFO's, having all the potentiometers in the 12 o'clock postion is sufficent. Just above the LFO's, the pan slider can be set for internal, external or somewhere in between. The Audio/ILDA switch should be in the down position.
The Internal and External Image sliders should all be in the full up position. To the right, the Image Offset sliders should be centered with the joystick toggle switch in the up position.
At the top right, Orbit, the size slider should be fully down, all switches in the down position, rate in the 12 to 1 o'clock position and FM in the full counter-clockwise position.
And last, Perspective, switches should be in the down position, orb size and aspect ratio should be full counter-clockwise and zoom should be in 1 o'clock position.
You may notice the Z-4 logo on the image to the right. This was the very first Z-5 produced before it was decided to call it a Z-5! All consoles after the first one will have the logo shown below. The Laser Systems Development Corp logo was used with the permission of the original founder.


This is the lower 2U panel of the Z-5 console. On the right is an illuminated power switch. Early versions of the Z-5 required 110VAC input, current models are 90 to 240VAC autoswitching. The audio in can be used as a signal source instead of an ILDA connection from a DAC. This can give you the ability to show an oscilloscope type representation of the audio, or many other effects. The output of the Z-5 console is within the audible spectrum, so along with watching the abstracts displayed, by connecting audio out to a sound system, you can listen to the abstracts as well! The audio in and out ports are AC coupled.
The ILDA IN connector can be connected to a DAC. The ILDA Out connects to your projector. The Color connector is very unique, designed to allow external color modulation for the Z-5 it also carries the color signals from a connected DAC controller. If you are running images from a DAC, you must either connect a loopback plug or a color mod box to the Color connector on the Z-5. If you don't, no color signals will pass from your DAC to the projector.
The ILDA IN connector can be connected to a DAC. The ILDA Out connects to your projector. The Color connector is very unique, designed to allow external color modulation for the Z-5 it also carries the color signals from a connected DAC controller. If you are running images from a DAC, you must either connect a loopback plug or a color mod box to the Color connector on the Z-5. If you don't, no color signals will pass from your DAC to the projector.
Video Demo of the Z-5 Features